How to bounce a track for mastering
07 September 2017
/ ServicesYou made the rightest decision and you're about to send your track to a professional mastering studio but... What do you export? Do you have to switch anything off? We solve it all in 5 steps! Easy peasy!

If you already read our article on how to bounce a track for mixing you're half way through! The main goal is the same: send your track exactly like you designed it.
Once the production and mixing of the track is done all the elements have already been procesed and shaped to work together and become one single piece. This game of elements has been aimed by applying different processes, so the first step should come easy:
1. Keep all your processes activated
If you worked on your mix, what's the point of turning your settings off? Your premaster is a stereo audio file where all your elements have already been fused and blended together, so the mastering engineer won't be able to isolate and modify any of the elements separately. We can work miracles here and there, but don't make it hard for us!
Select the track on your project and check that all the processes applied are activated. Go one by one to be completely sure.
Just in case you were wondering, your automations are also processes so we need them all activated.
2. Clear your master bus
This step may vary depending on how you work on your daw. Some producers apply processes directly on the master bus and other prefer to work by sections or groups —that's a personal choice.
The best way to know which processes of the master bus have to be left activated is to separate the processes on three groups:
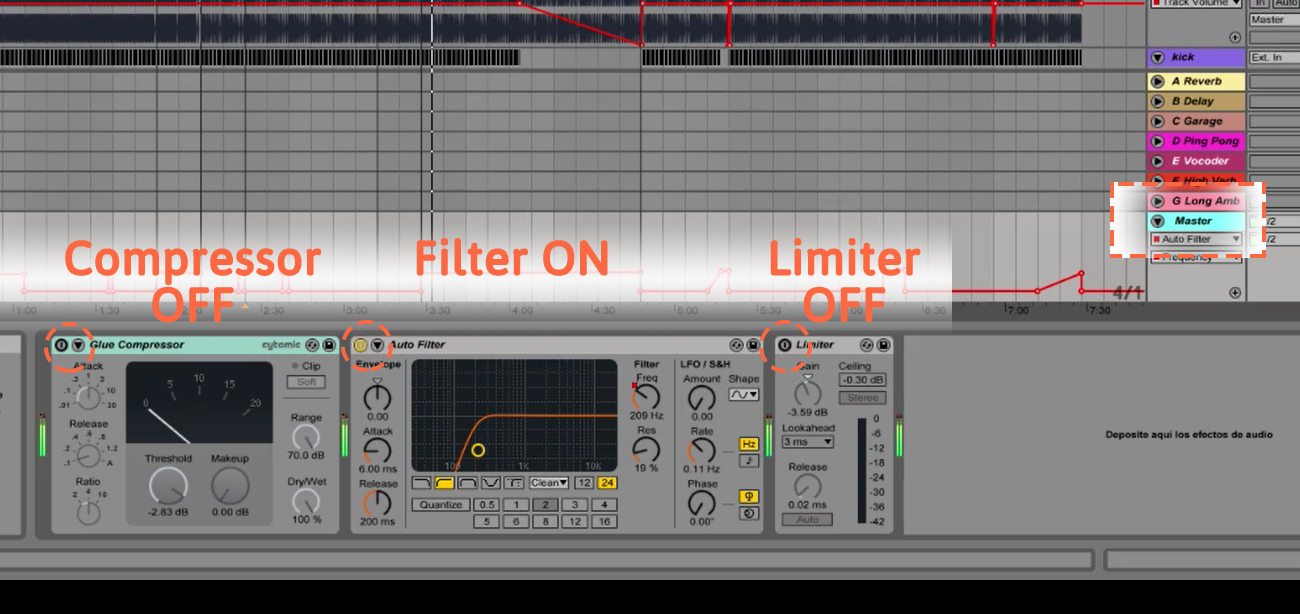
- YES OR YES — These are the processes that you must leave always activated when bouncing your premaster, and those are the filters (HPF, LPF). Filters depend on the production of the track and should be chosen and applied by the producer, not the sound engineer. If you applied them on your master bus you need to leave them ON when you export your file.
- NEVER EVER — These are the processes that you must never leave activated when you export your premaster, and those are the dynamic processors (limiters and compressors). If you leave them ON on your master bus the whole wave of your track will be modified and the mastering engineer will have a smaller margin to work with. Let him be the one to apply them!
- OPTIONALS — These are the processes you can choose whether to leave them activated or not, and that's the case of equalizations and frequency processors. If you have an EQ or an harmonic exciter on your master bus it may be improving the track indeed, or it may be spoiling the track. Since this depends on each project our advice is that you record two different versions, one with the processes activated and one without them, and let the engineer choose which one to use.

3. Traffic light rule: green is good, yellow is bad, red is TOO BAD
Traffic light rule is always important, no matter if you're producing, mixing or mastering. You must check that none of your individual tracks is peaking on your project and that the maximum peak of your master bus remains below -3dBs.
If you want to respect the dynamic of your elements you must control those peaks with the gain, not with limiters or compressors, so you must lower all your volumes at the same time and then lower the volume of your master bus until they all reach a good level.
Select all the tracks: click on the first one and, keeping Shift pressed, click on the last one, then when lowering one volume you will low all of them at the same time. Once they are all lower, reset the peak by clicking on it and check again the maximum levels they reach. Repeat the process with the master bus.
4. Let's bounce!
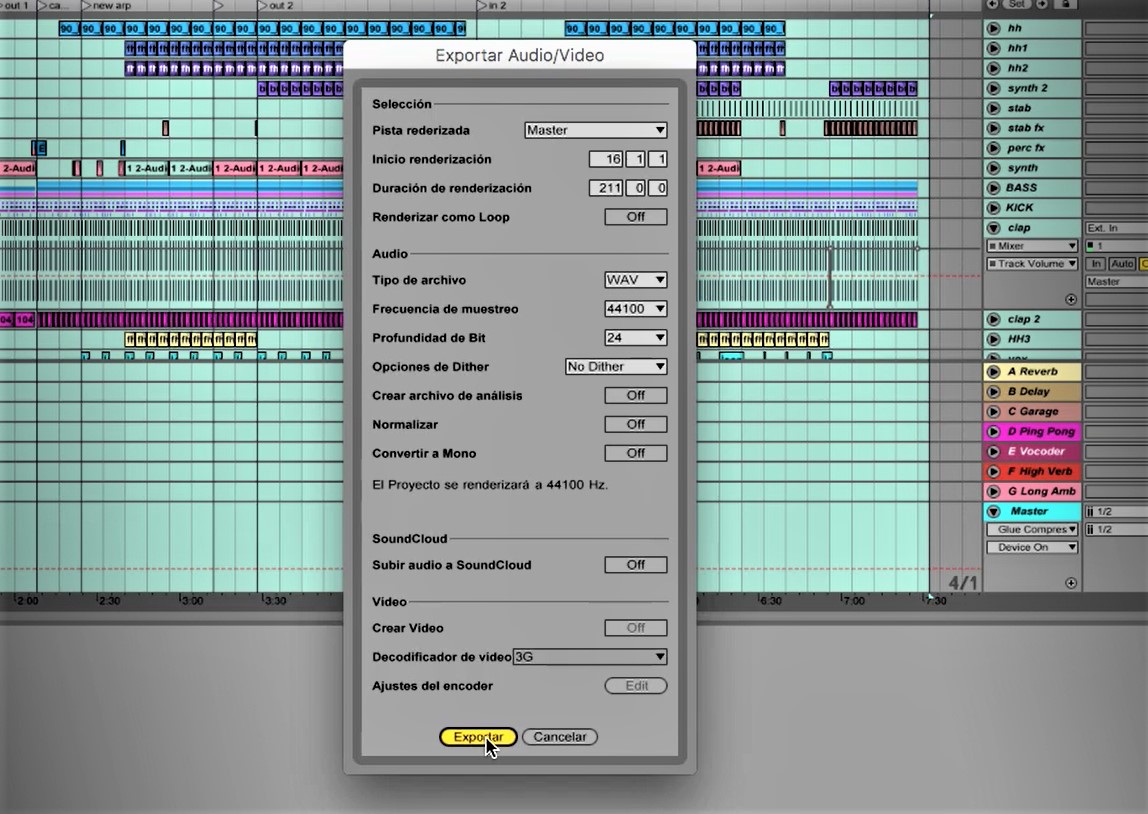
Once it's all ready you just have to bounce your master bus, and for that you need to first select the area you want to export. It is highly important that you leave at least one blank bar before and after your track; it's an essencial security meassure and it avoids more mistakes that you'd imagine! This way you can make sure you're not deleting the attack of your first kick or cutting the tail of any of your processes.
In order to send your track for mastering you need to export your master bus, and in order to send is to us you need to so do in WAV/AIFF, 24bits, 44.1KHz and no dithering.

5. Last but not least: check your file before you send it
It seems pretty obvious but it's really important that you check your file. Listen to it carefully and make sure that you didn't miss anything, that everything is in place and it is sounding just the way it should.
When you send your track for mastering, you pay for it, they work on it, you get it back, you listen to it and then realize that you left a synth muted by mistake, it's not cool at all. So to safe the tears, listen to it carefully before you send it (and if you end up messing it up, don't panic! You can always use our extra mastering service as many times as you want).
Besides checking how it sounds, you can also check how it looks. This is an easy guide, fast to check:

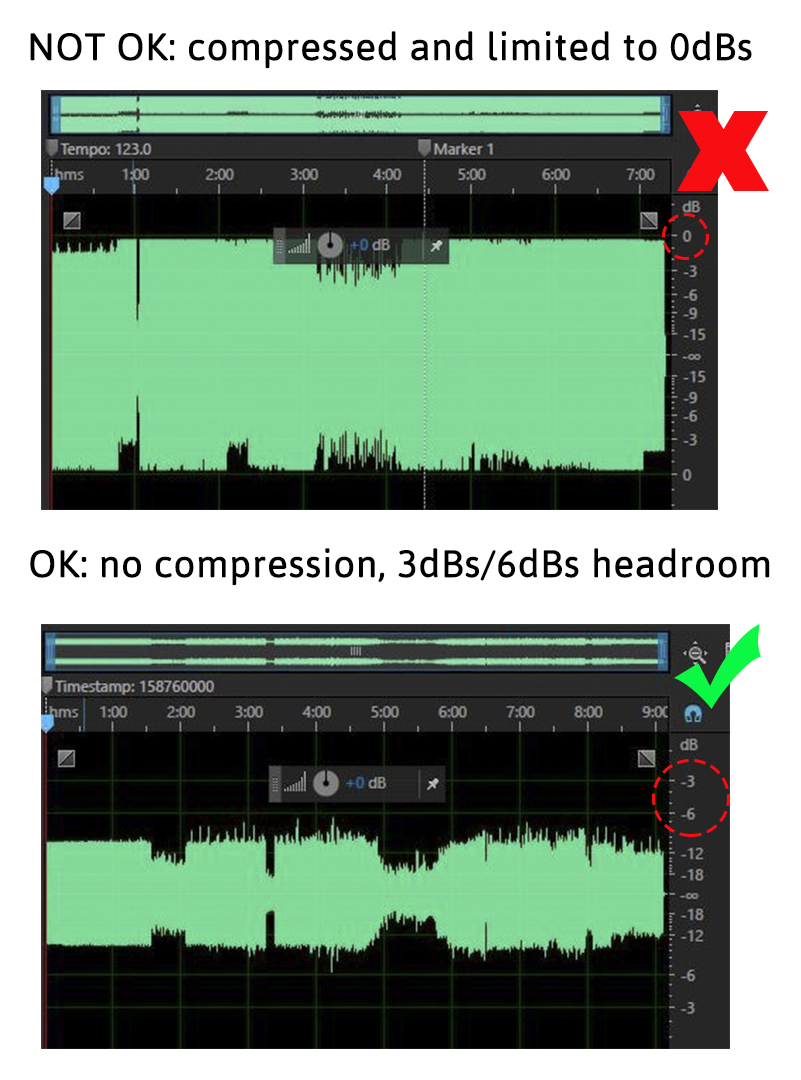
If your premaster looks like a brick: something went wrong! Go back and check every step you took.
If it looks lovely as the second image, and it also sounds exatly as it should: hell yeah, you did it! You're ready to send it to info@pobla.es!

You deserve it!